
AWS Marketplace
To install Blockdaemon Builder Vault from the AWS Marketplace, follow these steps to integrate this advanced key management system into your infrastructure, enhancing security with secure multi-party computation (MPC) for Web3 developers:
Prerequisites
Ensure that you have done the following:
- Select a Security/Deployment Pattern: Using an n or n + 1 AWS accounts pattern is recommended, where n equals the number of nodes. This setup involves using separate Node Admin accounts for each KMS package, ensuring secure admin control over each node, and a singular Builder Vault account for deploying the node infrastructure. For more info, please refer here.
Note:
While various configurations (e.g., a single Node Admin account for all KMS stacks or a single AWS account for all components) can achieve operational Builder Vault, such setups change inherent security considerations. The ideal configuration depends on the trust distribution among Builder Vault admins within your organization.
- Define a Namespace for Builder Vault: Choose a Namespace that will be consistently used across all CloudFormation stacks for the Builder Vault deployment.
Note:
This Namespace must be unique within the Builder Vault account, although multiple Builder Vaults with different Namespaces can be deployed.
- Prepare Node Admins and Infrastructure Engineer Access: Ensure that node admins and the infrastructure engineer responsible for deploying the Builder Vault core and node marketplace stacks possess adequate AWS expertise. They should have admin privileges within their respective AWS accounts to deploy resources.
- Follow AWS Root User Best Practices: Refrain from using the root user for installation activities. Follow the AWS best practices regarding root user management for AWS account security.
- Establish a DNS Public Hosted Zone: Create a DNS Public Hosted Zone for the Builder Vault node records. This zone will host DNS records for each node in the format:
https://node-0-<namespace>.<zone>. The deployment process will generate networking services within this zone.- Assign DNS Nameserver zone delegations from your company's authoritative zone to the new AWS name servers.
- In the AWS account designated for the deployment, create an AWS Route53 public-hosted zone. Record the Hosted Zone Id and Host Zone Name for use during the Marketplace deployment.
Note:
DNS name server zone delegations may require up to one business day for completion, depending on the authoritative zone settings.
Step-by-step Guide

Create AWS Accounts
First, create AWS accounts for each of the security and infrastructure administrators. To set up either a standalone or a member AWS account, please see here.
Note:
- Refrain from using the root user for installations. Adhere to AWS's recommended practices for root user management here.
- Note down the AWS account IDs. These will be required for the CloudFormation template.
Register an AWS Public DNS Hosted Zone
The second step is registering an AWS public DNS Hosted Zone for the Builder Vault nodes. To set up an AWS public DNS Hosted Zone, please see here.
Note:
Note down the AWS Hosted Zone name and ID. These will be required for the Builder Vault Node Infrastructure installation.
Deploy KMS Stack
The third step is to deploy the KMS Stack templates. KMS Stack templates are deployed independently from the Builder Vault Core template. Administrators must deploy a separate KMS Stack template for each Builder Vault TSM node, and these templates can be deployed to any AWS region. Follow the steps below to deploy the KMS Stack:
- KMS Stack administrator authenticates to their specific KMS Stack AWS Account.
- Stack 1 and Stack 2.
- Complete the following fields:
| Field | Description |
|---|---|
Stack Name | Provide the name for the Stack. |
BuilderVaultAWSAccount | Define the Builder Vault Node Infrastructure AWS account ID. |
Namespace | Specify a unique namespace. This will allow multiple deployments within the same set of AWS accounts. Ensure the same namespace value is used across KMS Stack and Core Node installation. |
NodeIndex | Specify the index of the installation. You need to match this KMS Stack install number. If this is the first installation, start with the value 1. |
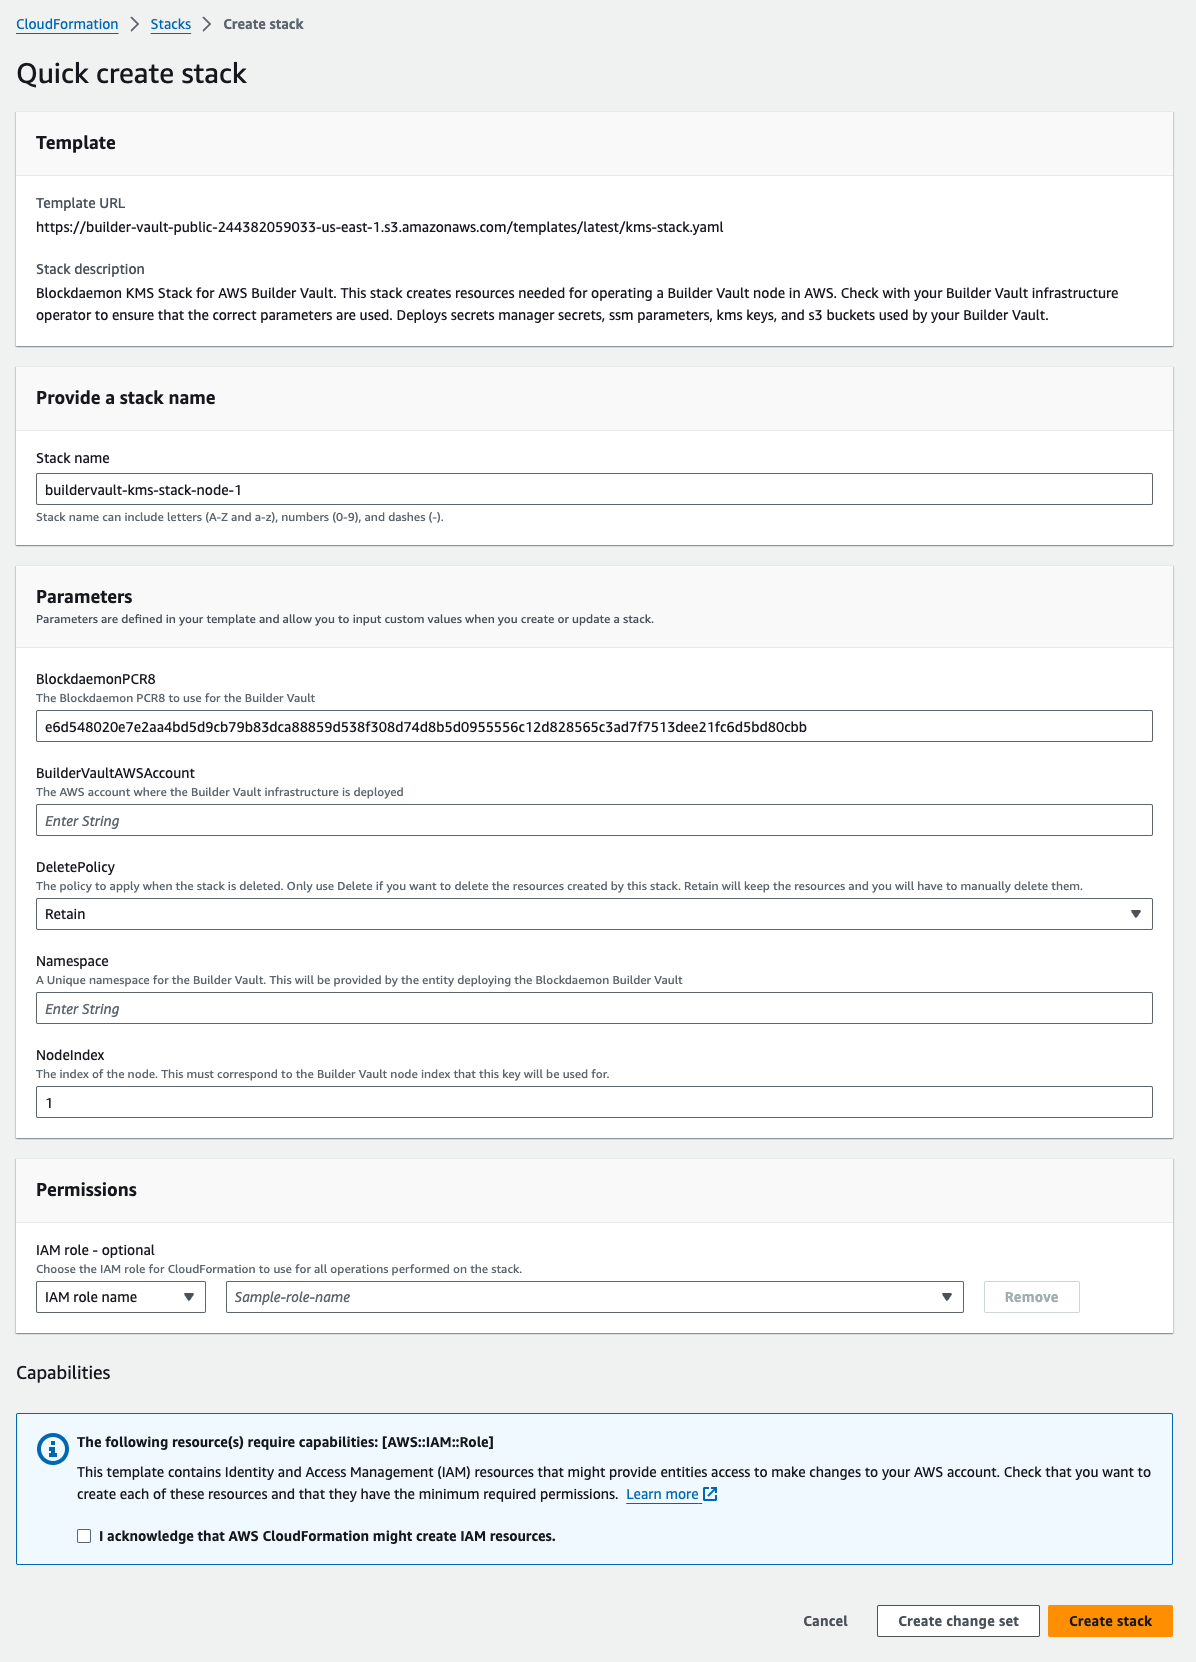
- Click the Create Stack button.
- Once the installation is completed, click the Outputs tab and note down the
SSMParametervalue. Write this ARN value down as it will be used in the Builder Vault Node Infrastructure installation.
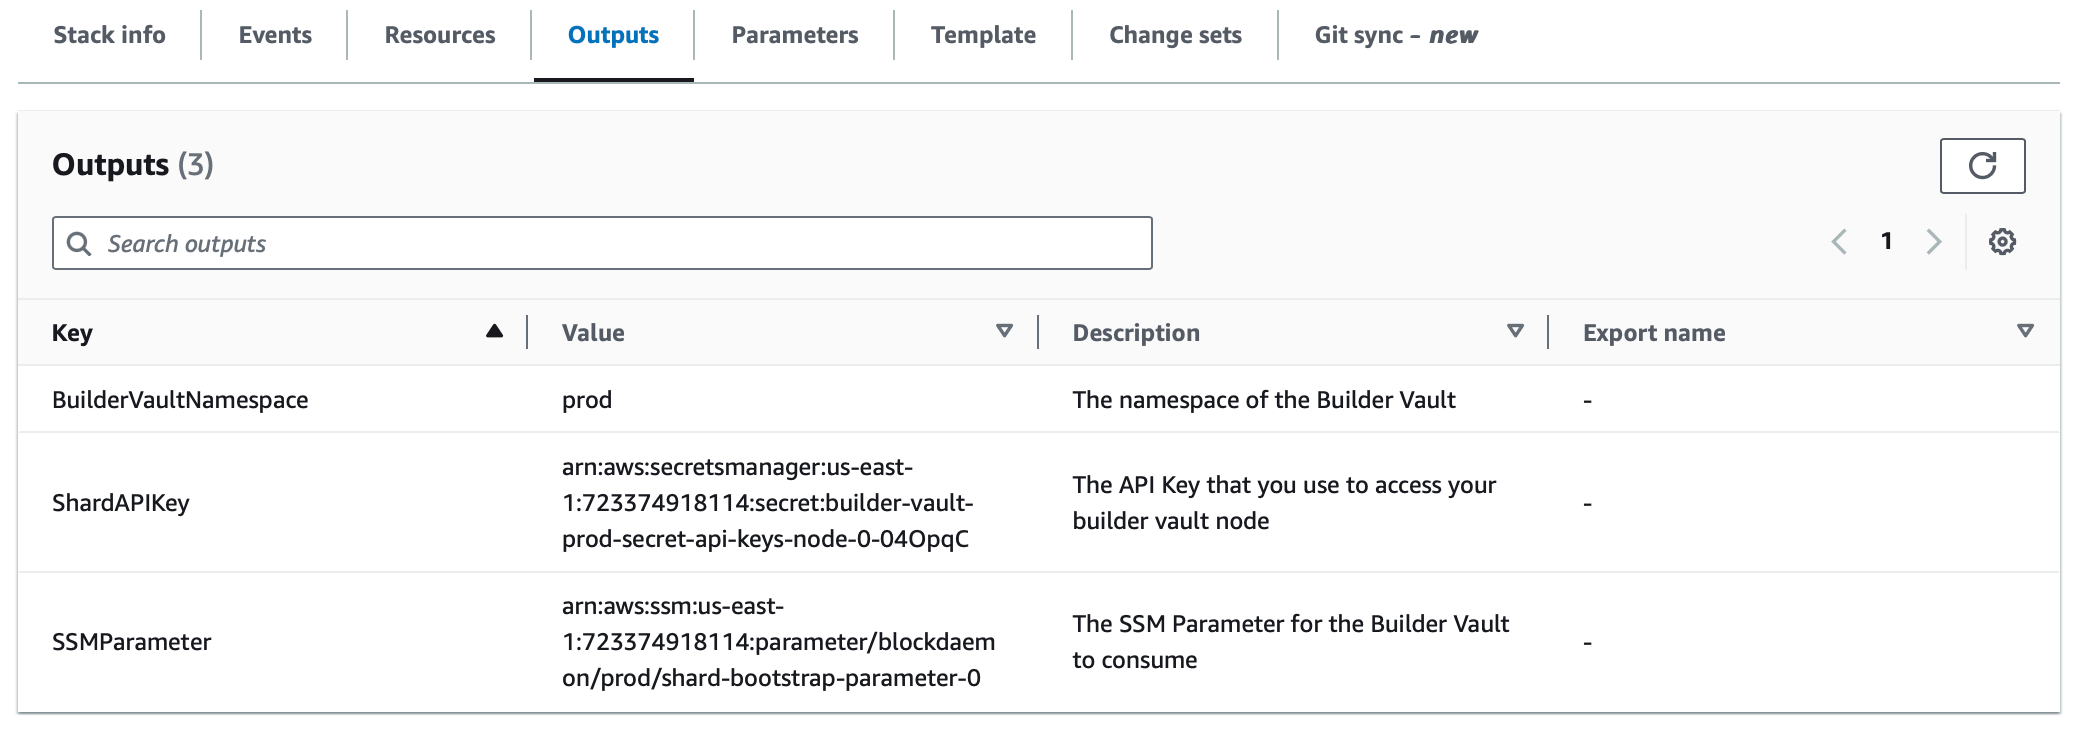
- Click on the Resource tab > click the Retrieve Secret Value button to get the
NodeIndex.
Note:
The
NodeIndexsecret contains the Builder Vault API key that will be needed to access the node.
- Repeat the process for the second KMS Stack before installing the Builder Vault node infrastructure.
Note:
Ensuring the
NodeIndexfor the second stack is set to2.
Deploy Builder Vault Core Nodes
The fourth step is to deploy the Builder Vault Code Node stack template to create the necessary networking, storage and AMI resources to run the MPC environment.
- Infrastructure Administrator authenticates to the Builder Vault Node Infrastructure AWS Account.
- Create the Blockdaemon Builder Vault Core Node template.
- Complete the following fields:
| Field | Description |
|---|---|
Hosted Zone ID | Specify with the Hosted Zone ID that you established earlier. |
Hosted Zone Name | Specify with the Hosted Zone Name that you established earlier. |
Namespace | Specify with the Namespace value that you used in the KMS Stack installation. |
SSMParameter | Specify with the value that you obtained from the Resource tab in the KMS Stack installation. |
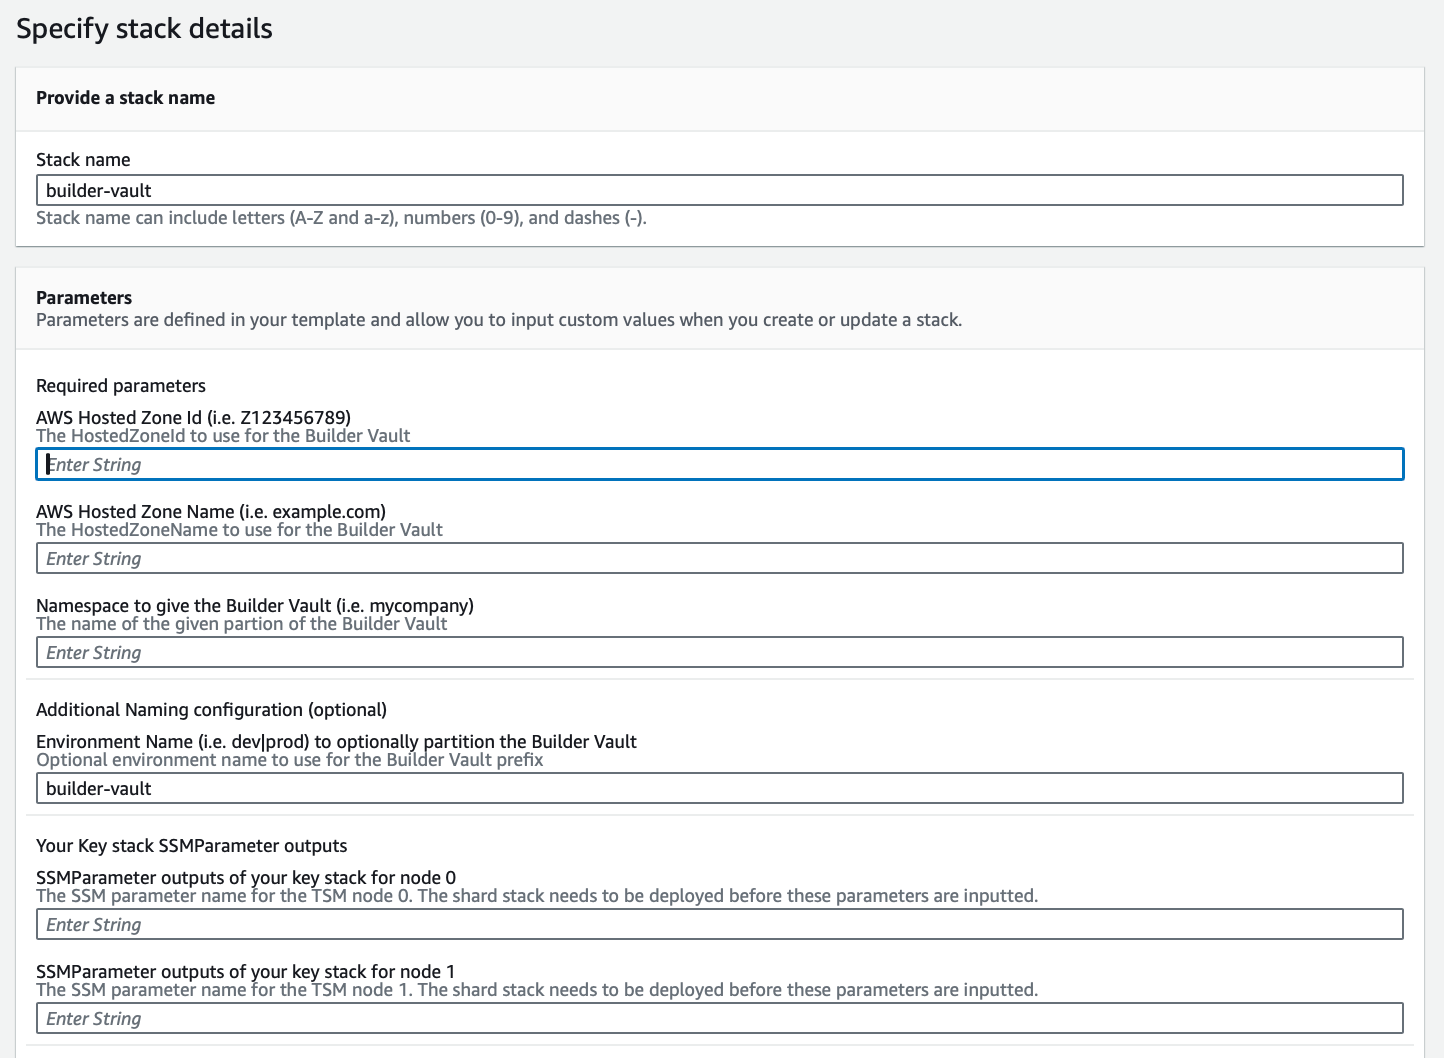
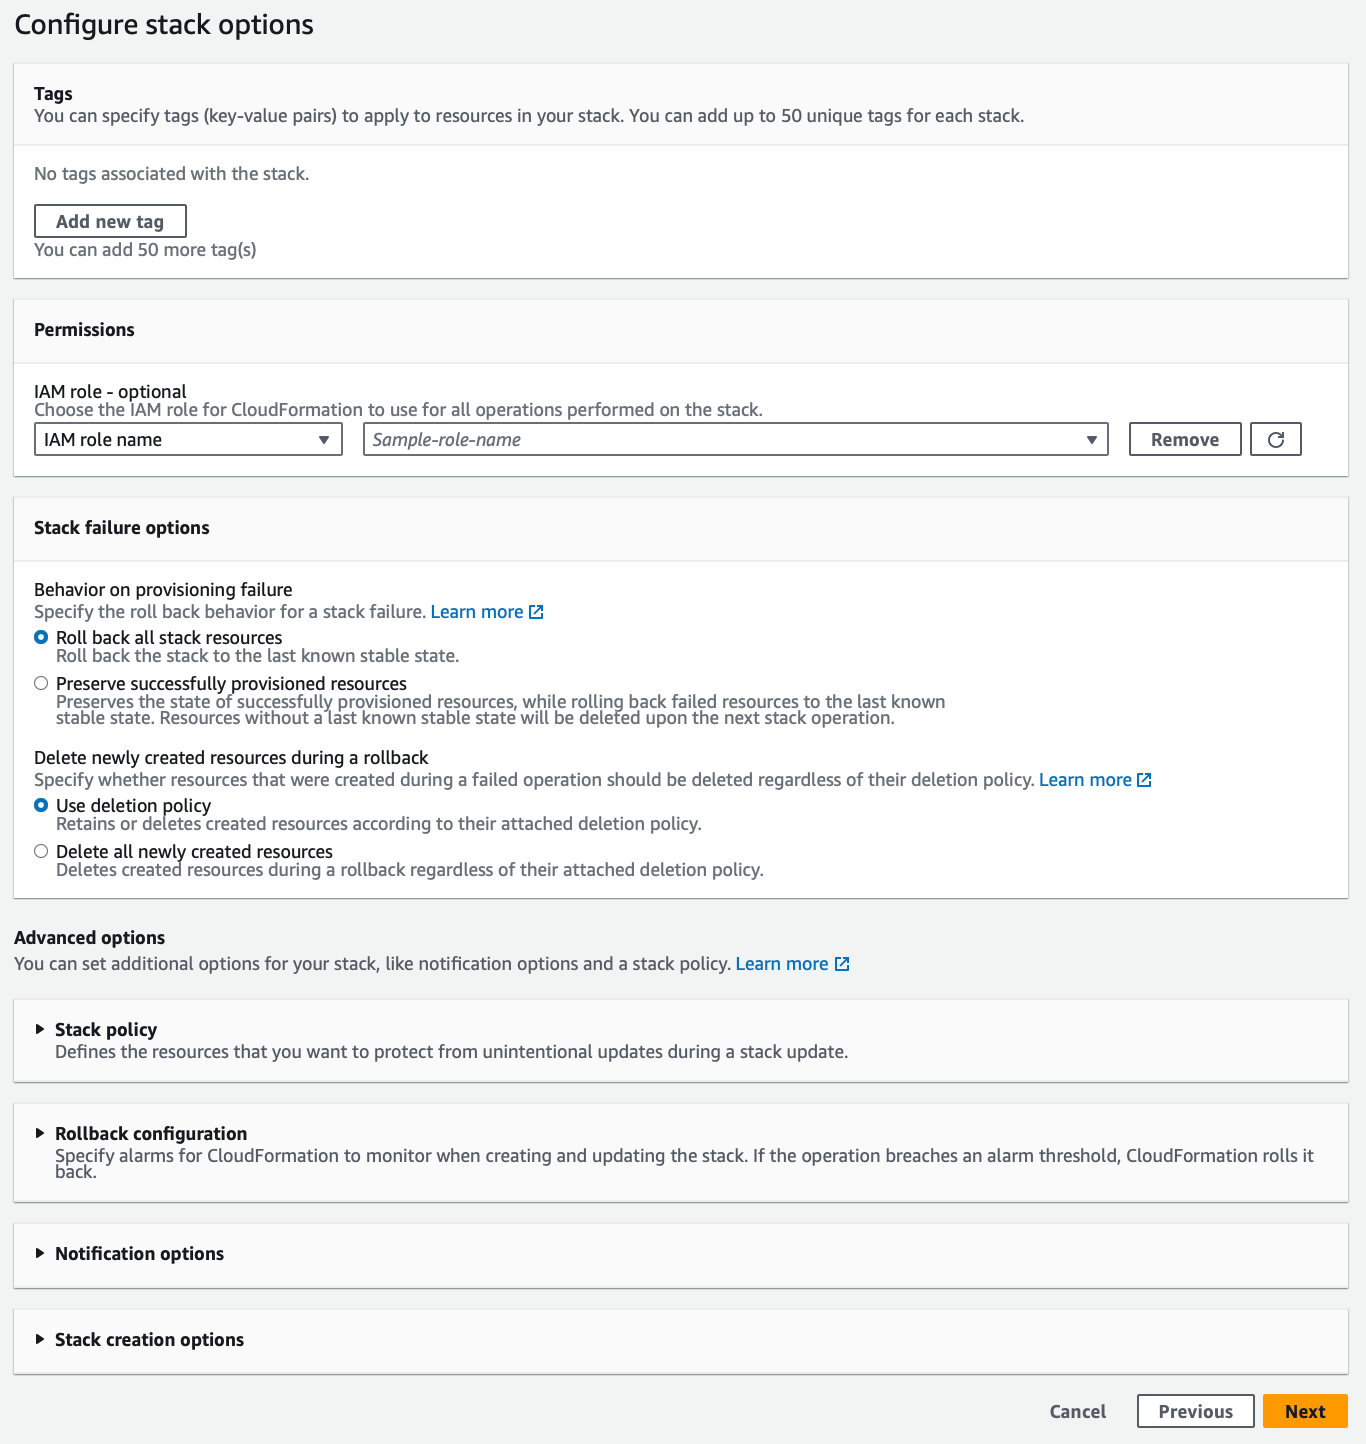
- Click Next.
- The installation will default create new VPC networks and subnets with the CIDR ranges specified below.
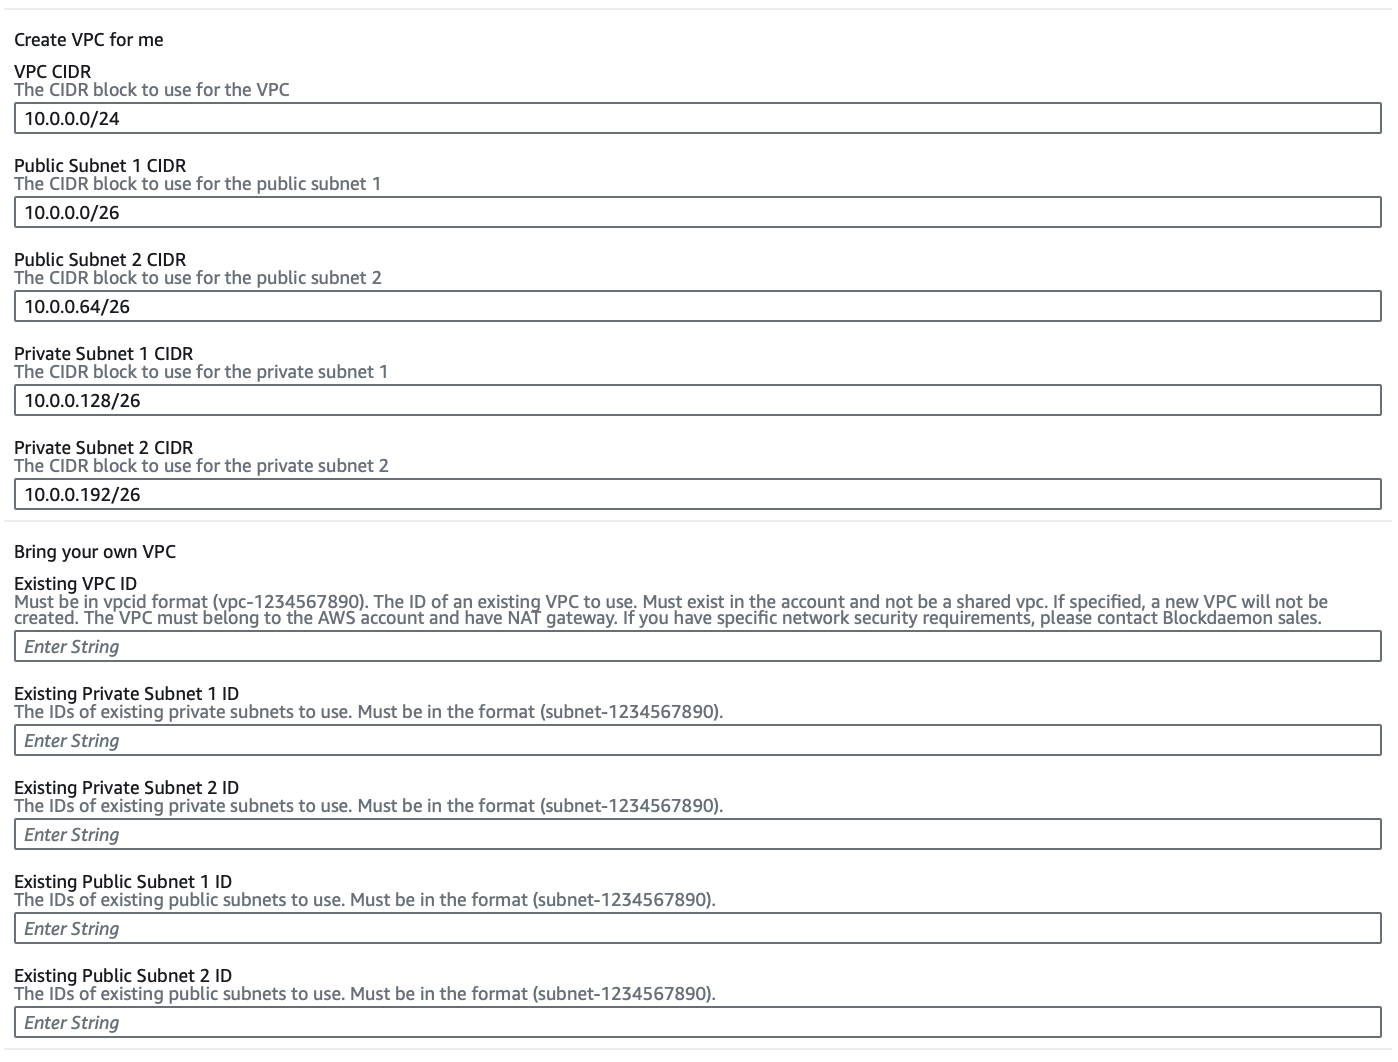
Note:
If you wish to deploy the Builder Vault into existing VPC networks, simply populate the
Bring your own VPCfields and theCreate VPC for mevalues will be ignored.
- To restrict access to the Builder Vault Code Node SDK or P2P endpoints, specify the CIDR ranges that should be allow-listed.
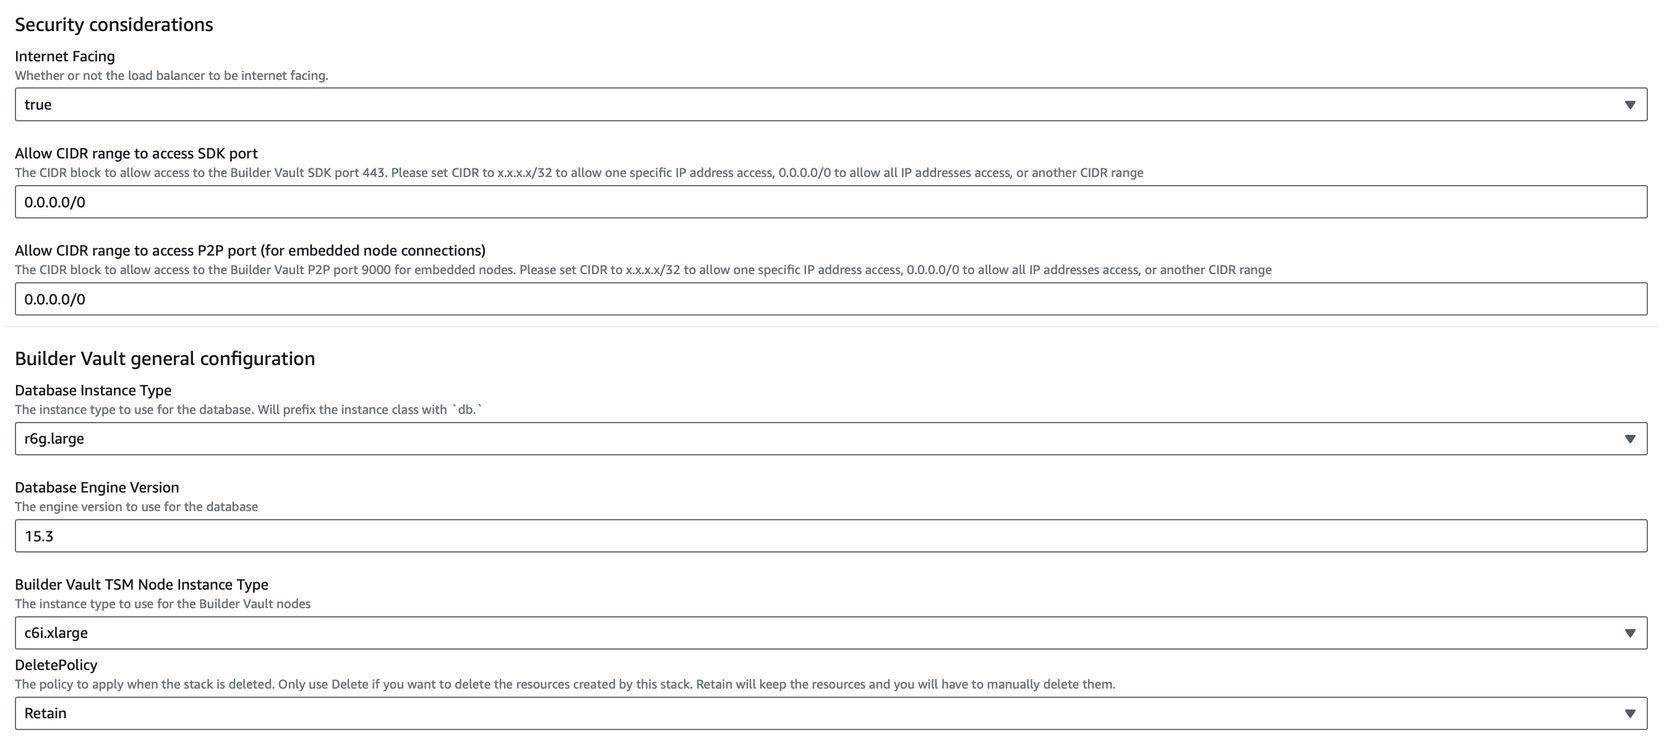
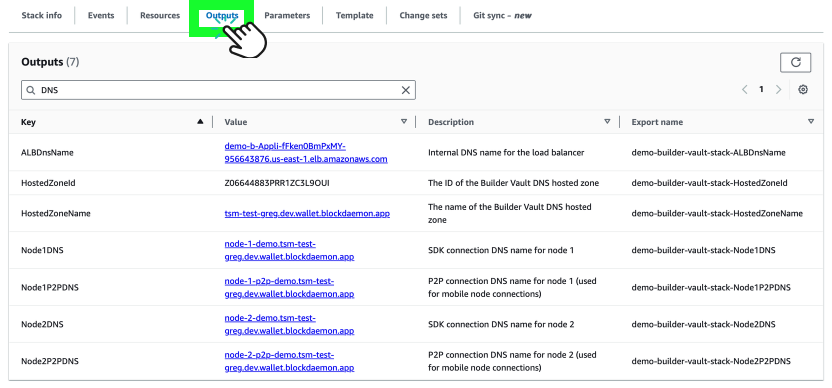
- Once the installation is completed, click the Outputs tab > note down the
Node0DNSandNode1DNSvalues. These endpoints will be used to configure the Builder Vault client SDK.
Deploy Additional Dynamic Builder Vault Nodes
The fifth step is to deploy additional dynamic Builder Vault nodes to extend the Builder Vault system past the two nodes setup.
- Repeat the KMS Stack deployment from step 1 by installing a new KMS Stack into a new AWS account.
Note:
For each additional node, increment the NodeIndex appropriately. For example, if this is the third node the
NodeIndexshould be2. Note down theSSMParameter ARNto be used in the next step.
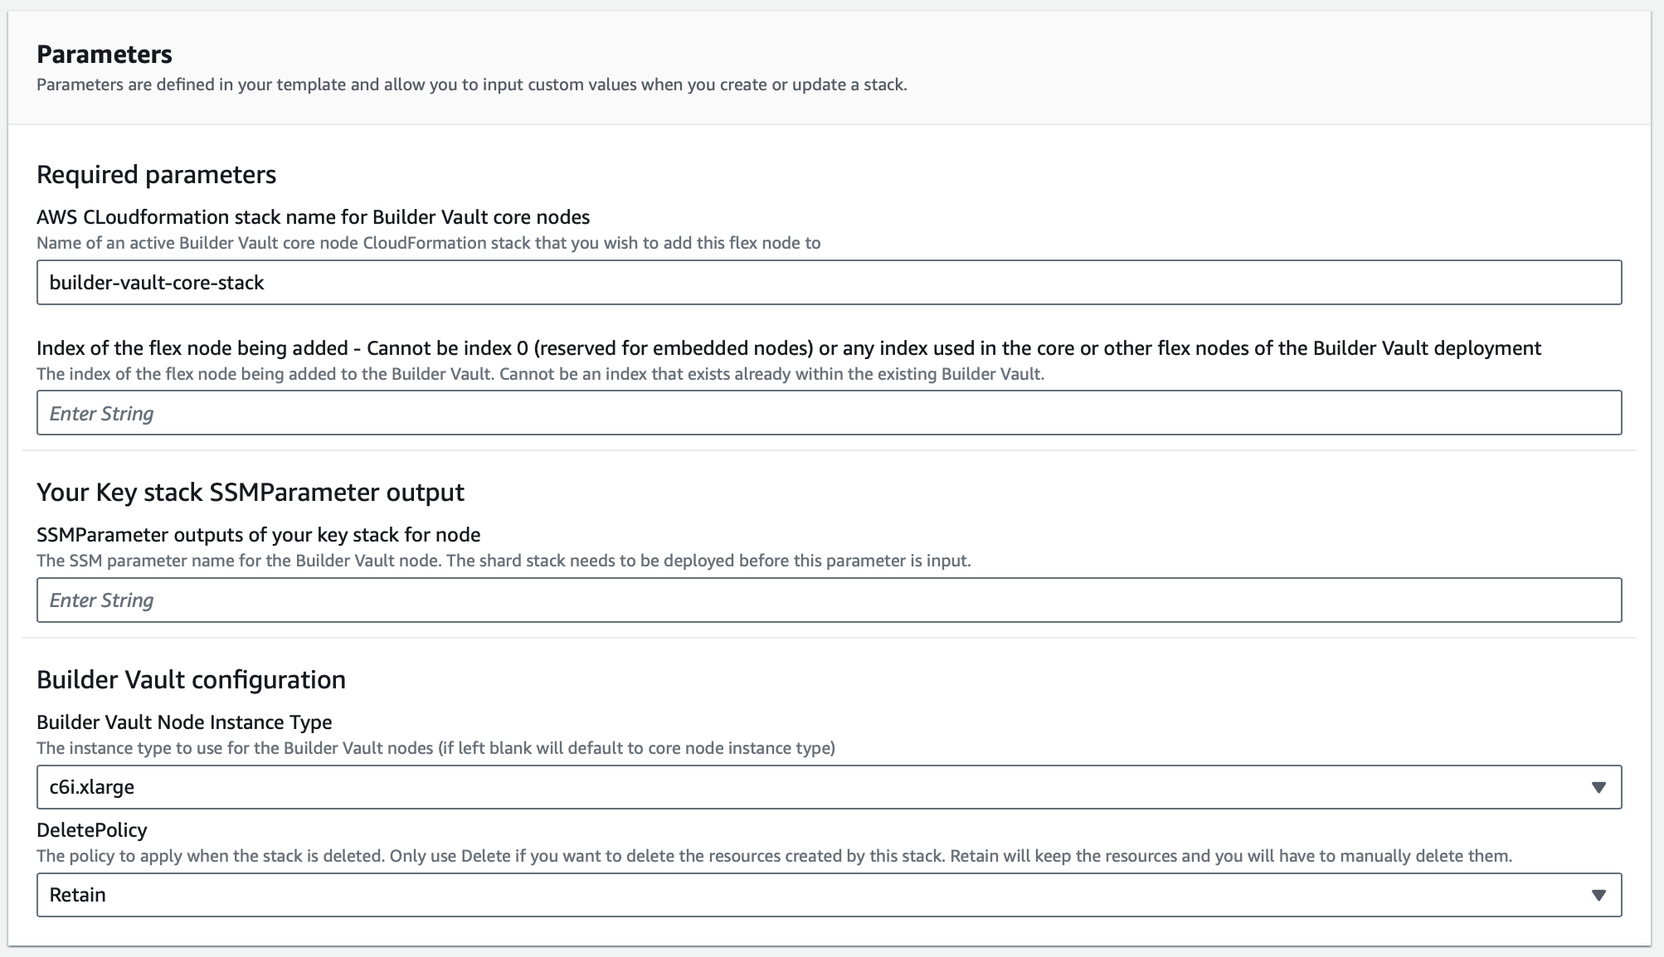
- In your Builder Vault dynamic node AWS Account, create and deploy the Builder Vault Node stack template.
Note:
Set the node index to the total number of dynamic nodes plus 2. For the first dynamic node beyond the two core nodes, set the index to 3.
- Once the installation is complete, click the Outputs tab > note down the
Node*DNSvalue for use in the client SDK configuration. - To apply topology updates across all nodes, reboot each by navigating to EC2-Instances > Reboot Instance.

Setup the Builder Vault Client SDK Connectivity
The sixth step is to Initialize the Builder Vault Client SDK with your generated API Keys and Node DNS in the SDK settings using the following code:
config := tsm.Configuration{URL: "https://<Node1DNS>"}
config = config.WithAPIKeyAuthentication("<Node API Key>")
node, err := tsm.NewClient(config)
Updated 21 days ago